


A Step-by-Step Guide to Building a New Home

Houses are available in all varieties to suit all needs. Due to the wide variety of existing homes and the high cost of building a new home, most potential homeowners purchase an existing home. And that’s not a bad choice at all. Most homes are durable enough to last for decades, can be easily renovated, and have the potential to increase in value.
However, building a home does have an undeniable appeal. You can construct and model a new home right according to your requirements. You will have few if any, hidden problems. Hazardous materials like lead-based paint and asbestos are non-existent. New benefits are built into the house. Therefore, it is not surprising that most people plan on building a home rather than buying an old one if all other factors were the same.
Table of Contents
Save money with Sweat Equity

If you’re planning to get involved in building your home, there’s a way to do it: sweat equity in the form of smaller and individual projects.
Late-stage post-contract projects can be done by the owner instead of the contractor. These last-stage projects are better for DIYers because you won’t risk delaying your home building project:
- Build patios and walkways
- Plant trees, shrubs, and maintain lawns.
- Paint the exterior of the house
- Paint the interior of the house
- Install window treatments
- Install carpet
- Finish the basement
Prepare the home site

First, it’s time to decide on a site for your home, literally and figuratively. Not only are you going to have your project on your mind and on paper, but you are also siting your planned home on the intended location.
- Clear the construction site of brush and other debris, down to ground level and at least 25 feet around the intended perimeter of the home.
- Make changes to the topography of the site if necessary to alter the flow of water through the site – this often requires a contractor with earthmoving equipment.
- Ask for a garbage container to handle garbage during the construction project.
- Order one or more portable toilets.
- Request temporary utility services from the utility company.
- Hire an electrician to connect a temporary electrical panel, which usually mounted to an existing utility pole.
Pouring concrete footings and foundation

The site takes shape with the excavation and installation of foundations and slabs. Excavation contractors and foundation specialists do this work.
- The contractor digs trenches deep enough for the frost footing. The foundation should rest below the planned freeze line for your area to prevent frost from building up, which can damage your home.
- Inspectors arrive to verify the dimensions of the footing trenches.
- The contractor pours concrete for the footings.
- Footing drains are constructed and designed to drain water from footers and protect them.
- The contractor builds vertical foundation walls that are supported by footings.
- The foundation is waterproofed to the final level. Holes in the foundation wall allow routing of water supply and drainage pipes.
Install plumbing and electricity

If you are laying a slab-type foundation, you will need to hire plumbers and electricians to perform some of the services before pouring this concrete slab:
- Plumbers lay the pipes and then cover them.
- If there are electrical lines running through the concrete slab through metal conduits, now is the time to run those conduits.
Pour the concrete slab
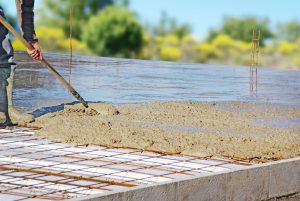
- For the slab of a house, the contractor will install the foam slab insulation first.
- A minimum 4-inch gravel base runs over the foam board, forming the base of the concrete.
- Next comes a plastic vapor barrier.
- The wire mesh reinforcement is then laid and positioned so that it is slightly raised off the ground. This will allow the reinforcement to sit in the middle of the concrete layer, where it will provide the strongest reinforcement.
- The contractor will now pour the concrete slab, probably from trucks that deliver a large quantity of concrete.
- If you are building a garage or basement, now is the time to pour concrete in those areas as well. It’s expensive to bring in the concrete contractor for another pour, so it’s worth doing all the concrete work at the same time.
Frame, side, and roof of the house

You will soon begin to recognize your project as a house after the excavation, foundation, and concrete work. The carpenters will come and install the wood frame for the floors, walls, and ceilings, then they will move on to the installation of the sheathing, siding, and roof. In a week or two, you can suddenly recognize this structure as a house, with walls and a roof.
- Prepare a framing order of the required wood, nails, house wrap, and necessary adhesives, based on your construction plans.
- When the weather is fine, the carpenter will arrive at frame the walls of the house, including the floor, ceiling, and roof skeleton – framing is the basic shell of the house, minus the siding and roof surface. At this time the rough openings for windows, doors, and skylights will be framed. The basic sheathing of the wall and ceiling surfaces completes this step.
- Install windows, doors, and skylights. The same carpenters that did the framing can also do this task, although occasionally the manufacturer’s team will come in and do this job. It is also a job that some homeowners can do.
- Finally, roofers complete the application of flashings and shingles or other finished roof surfaces – the basic framing of the house is now complete.
Install electrical, plumbing, and insulation

Now, your home’s interior work begins with the arrival of bricklayers, electricians, plumbers, and HVAC specialists.
- Masons build the fireplace if your home is modeled for one. Typically this involves applying a brick or stone veneer over a concrete block base that has been laid by the foundation contractor.
- Electricians and plumbers perform prep work for electrical circuits, plumbing lines, and HVAC ductwork. This job is easier without the walls, floors, and ceilings in place. Upon completion of the work, these contractors will return once the walls and ceilings are in place, to complete the final connections for the various devices.
- The organization of permits and inspections is the responsibility of the contractor. If you do it yourself, you will be responsible for the inspections.
- Install insulation in the walls and attic. You can hire a carpenter or an insulation contractor.
Hang drywall and install trim
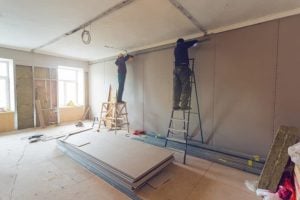
The interior will begin to look finished as the wall and ceiling surfaces are installed.
- Drywall is hung throughout the house – all wall and ceiling surfaces are usually hung before work is continued.
- The drywall joints are sealed, smeared with joint compound, and the finish is sanded.
- All interior walls and ceilings are primed and are often done with spray equipment. This happens very quickly as there is no need to worry about trim and floor surfaces.
- All trim molding is installed, including window and door frames and crown molding. All cabinets hang in bathrooms, kitchens, and other spaces.
Paint the walls and do the finishing work

After you have installed drywall and primed the walls, call the painter.
- The walls are painted and the ceilings are painted or finished with a texture. These are jobs that homeowners can do on their own to save money. But for homeowners who used to paint just a room or two, keep in mind that painting an entire house is a huge task.
- Specialized companies supply and install kitchen and bathroom furniture.
Install the floors

Install flooring (or flooring) surfaces throughout the home. Flooring options include carpet, hardwood, laminate flooring, ceramic tile, luxury vinyl plank, and engineered wood flooring. Typically this is a job for another subcontractor, although homeowners can tackle installing certain sections of the flooring.
- Clean up the workplace by placing all acceptable debris in the trash container.
- The contractor will hire a company specialized in post-construction cleaning.
Final matters
- Complete exterior layout. To save money, it can be a DIY project. Or you can hire your own landscaping company to design and install a graceful landscape for you.
- Remove the garbage container – Call the garbage disposal company to pick up the garbage container and specify that it does not need a replacement.
- Organize final inspections by licensing agencies.
- Plan a final visit if you use a general contractor.
- Arrange for a final inspection by your lender if you have financed the construction of your home with a construction loan.
Relevant Article:
https://falaya.com/learn/posts/most-suitable-neighborhoods-to-live-in-baton-rouge/
Leave a Reply